도커허브 이미지 올리기
실습용 도커이미지 생성
# ubuntu 이미지 다운로드
docker pull ubuntu:20.04
docker images
# 실습을 위한 디렉터리 생성 및 이동
mkdir -p /root/myweb && cd /root/myweb
# Dockerfile 파일 생성
vi Dockerfile
FROM ubuntu:20.04
ENV TZ=Asia/Seoul VERSION=1.0.0 NICK=<자신의 닉네임>
RUN ln -snf /usr/share/zoneinfo/$TZ /etc/localtime && echo $TZ > /etc/timezone && \
sed -i 's/archive.ubuntu.com/mirror.kakao.com/g' /etc/apt/sources.list && \
sed -i 's/security.ubuntu.com/mirror.kakao.com/g' /etc/apt/sources.list && \
apt-get update && apt-get install -y apache2 figlet && \
echo "$NICK Web Server $VERSION<br>" > /var/www/html/index.html && \
echo "<pre>" >> /var/www/html/index.html && \
figlet AEWS Study >> /var/www/html/index.html && \
echo "</pre>" >> /var/www/html/index.html
EXPOSE 80
CMD ["usr/sbin/apache2ctl", "-DFOREGROUND"]
# 이미지 빌드
cat Dockerfile
docker build -t myweb:v1.0.0 .
docker images
docker image history myweb:v1.0.0
docker image inspect myweb:v1.0.0 | jq
# 컨테이너 실행
docker run -d -p 80:80 --rm --name myweb myweb:v1.0.0
docker ps
curl localhost
# 웹 접속 확인
curl -s ipinfo.io/ip | awk '{ print "myweb = http://"$1"" }'
생성 후 태그를 바꾸어주고 내 도커허브에 푸시해준다.
#
DHUB=<도커 허브 계정>
DHUB=gasida
docker tag myweb:v1.0.0 $DHUB/myweb:v1.0.0
docker images

# 도커 허브 로그인
docker login
Username: <자신의 ID>
Password: <암호>
## 로그인 정보는 /[계정명]/.docker/config.json 에 저장됨. docker logout 시 삭제됨
## cat /root/.docker/config.json | jq

# push 로 이미지를 저장소에 업로드
docker push $DHUB/myweb:v1.0.0
활용
이제 내 로컬에서 아래를 실행하면
docker run -d -p 80:80 --rm --name myweb $DHUB/myweb:v1.0.0내 도커허브에서 이미지를 다운받아 실행을 하게 된다.
[CI] 젠킨스 사용해보기
- 서버 설치하기.
# 실습 편리를 위해서 root 계정 전환
sudo su -
# Add required dependencies for the jenkins package
# https://docs.aws.amazon.com/corretto/latest/corretto-17-ug/amazon-linux-install.html
sudo yum install fontconfig java-17-amazon-corretto -y
java -version
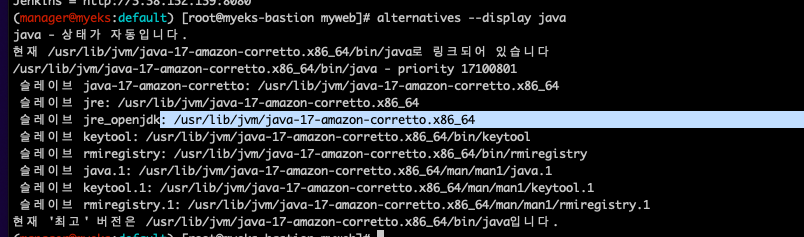
alternatives --display java
JAVA_HOME=/usr/lib/jvm/java-17-amazon-corretto.x86_64
echo $JAVA_HOME
# 젠킨스 설치
sudo wget -O /etc/yum.repos.d/jenkins.repo https://pkg.jenkins.io/redhat-stable/jenkins.repo
sudo rpm --import https://pkg.jenkins.io/redhat-stable/jenkins.io-2023.key
sudo yum upgrade
sudo yum install jenkins -y
sudo systemctl daemon-reload
sudo systemctl enable jenkins && sudo systemctl start jenkins # 다소 시간 걸림
sudo systemctl status jenkins
# 초기 암호 확인
sudo systemctl status jenkins
cat /var/lib/jenkins/secrets/initialAdminPassword
# 접속 주소 확인
curl -s ipinfo.io/ip | awk '{ print "Jenkins = http://"$1":8080" }'cat /var/lib/jenkins/secrets/initialAdminPassword 로 받은 초기비밀번호로 아래화면에서 접속한다.
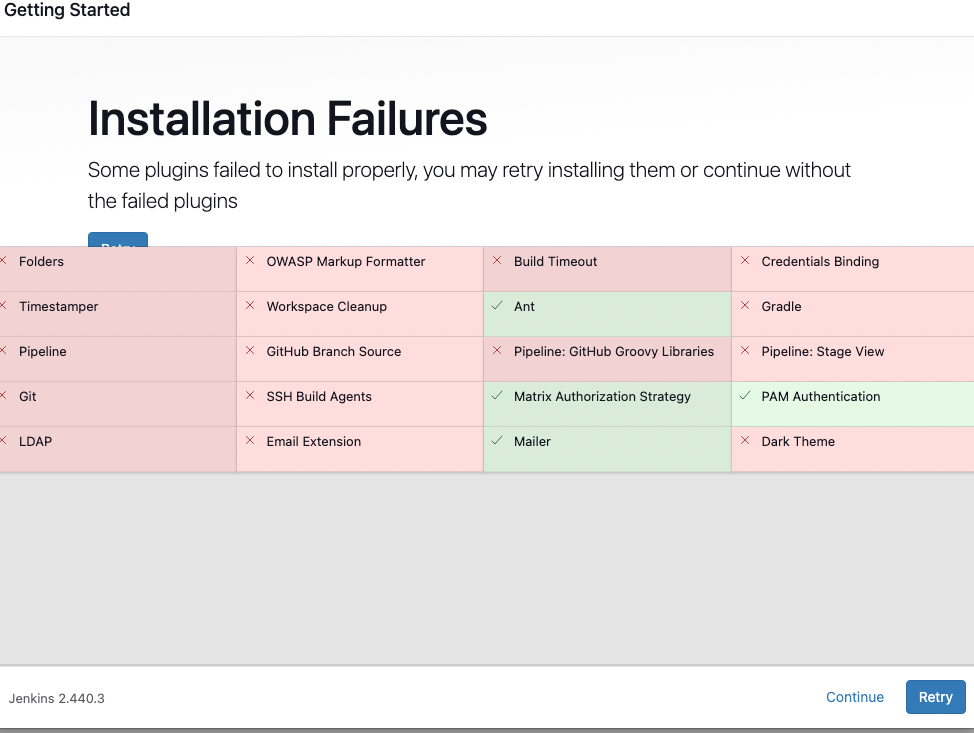
그리고 suggested plugin 설치를 클릭해준다.

나의 경우에는 젠킨스 설정이 다 되지 않은 상태로 일단 진행을 한다..ㅠ
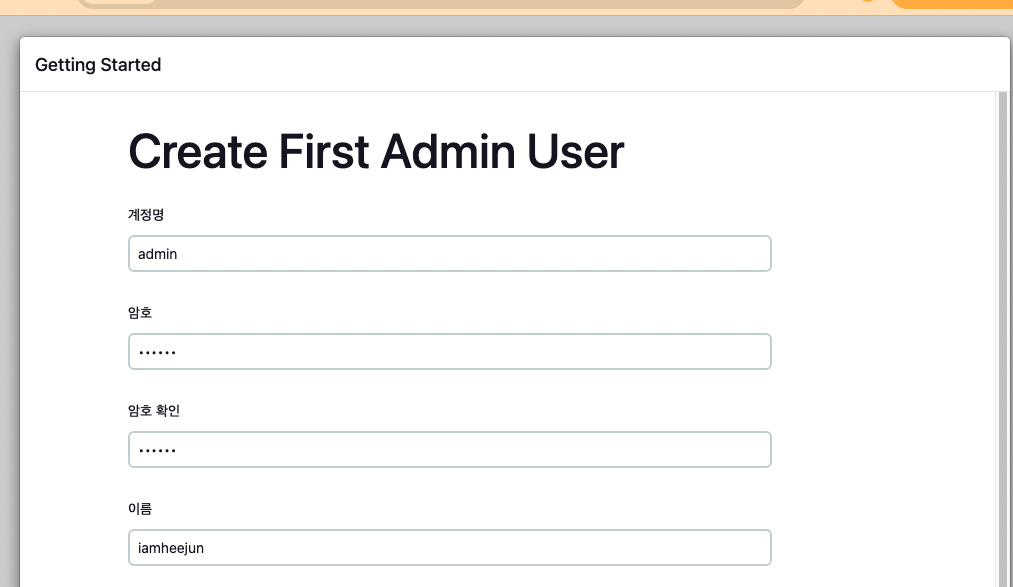
처음에 들어와서
Jenkins관리 > Tools에서 다음 설정을 해준다.
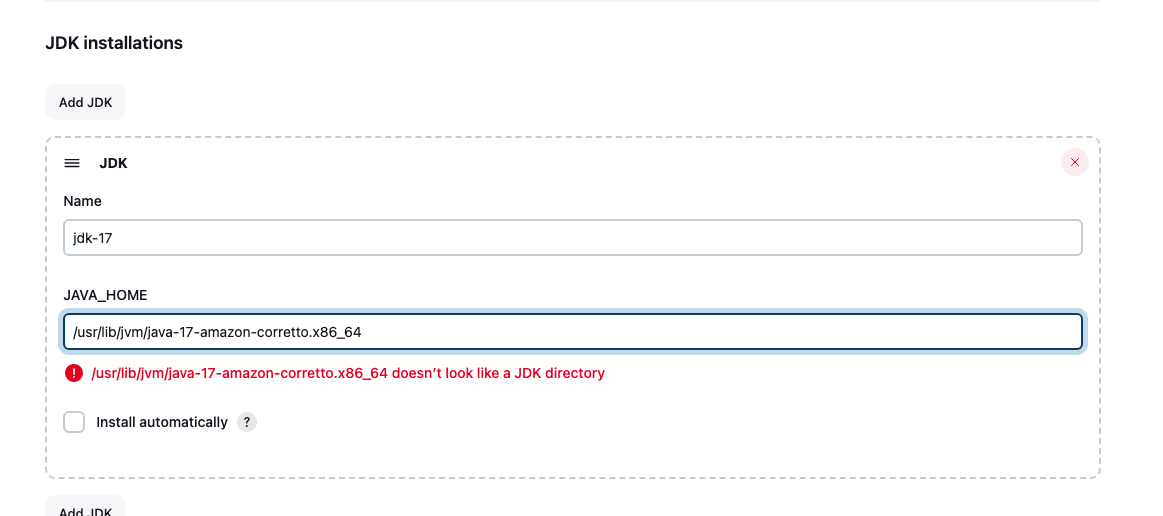
위 경로는 아래처럼 alternatives --display java 로 볼 수 있다.
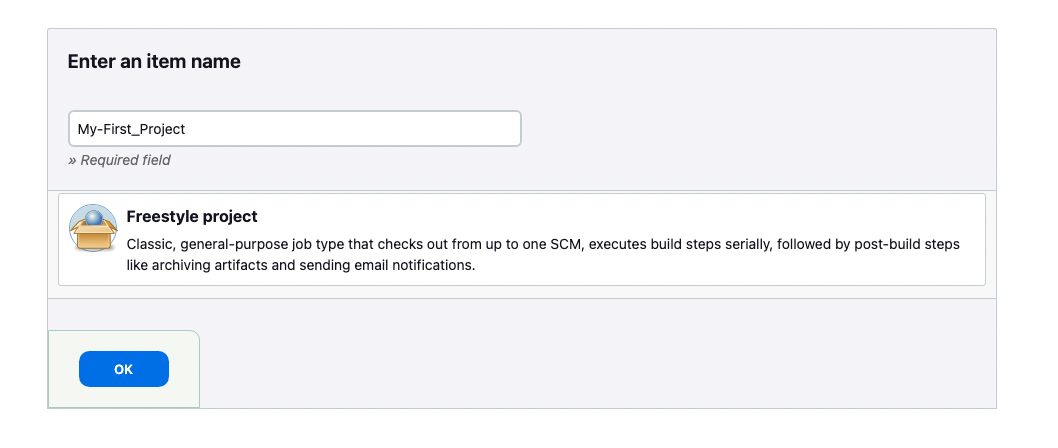
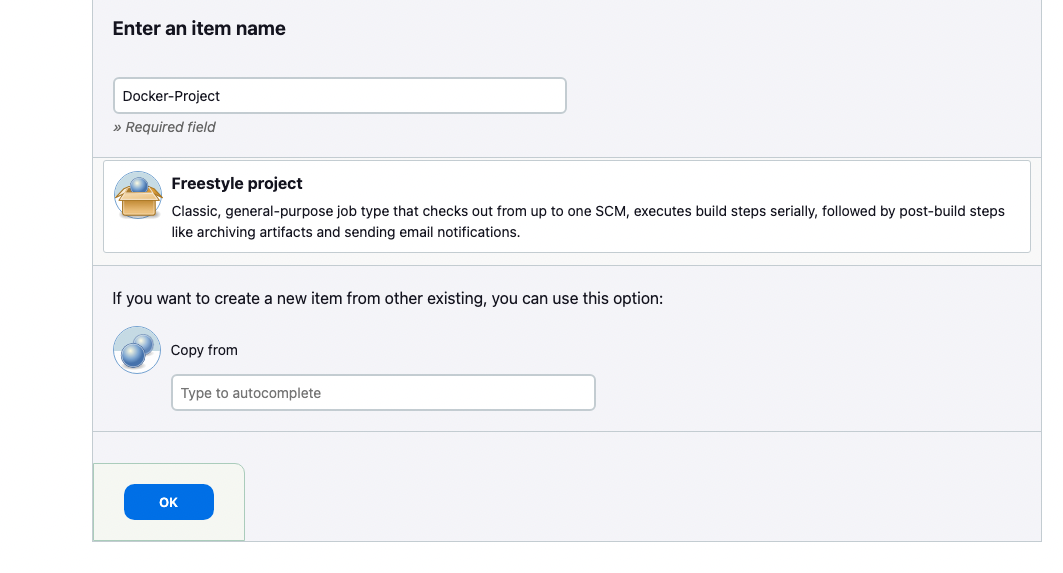
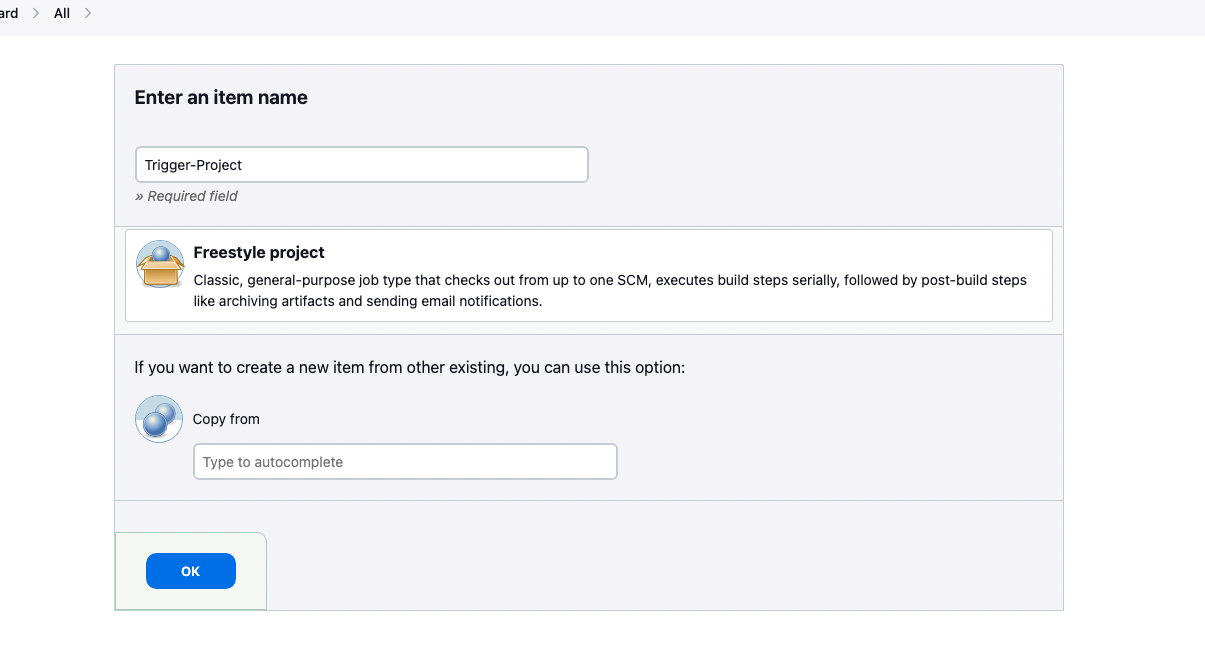
첫번째 Item(Project) 생성
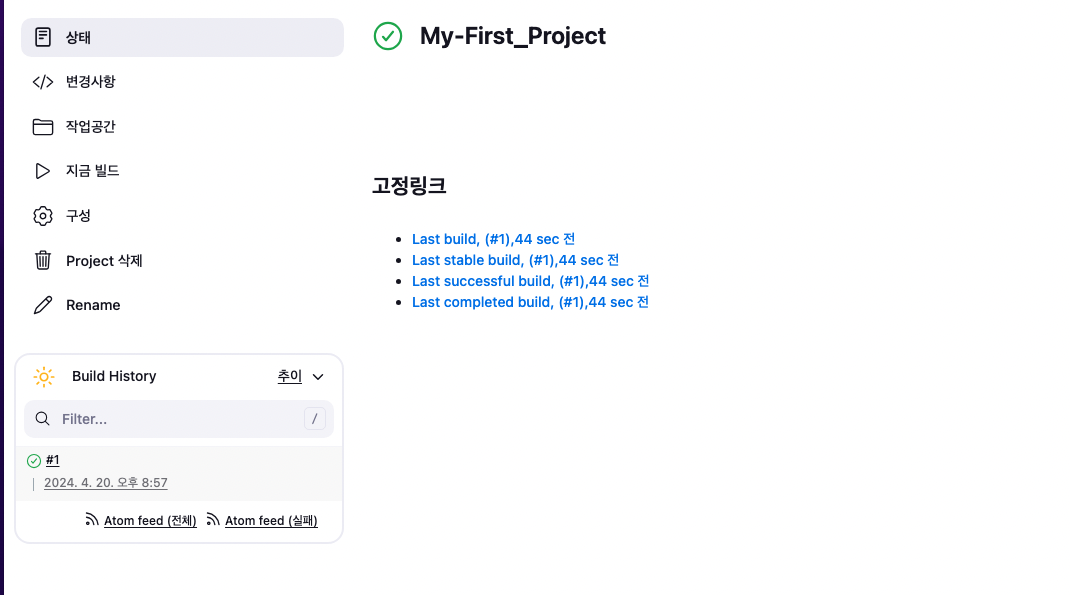
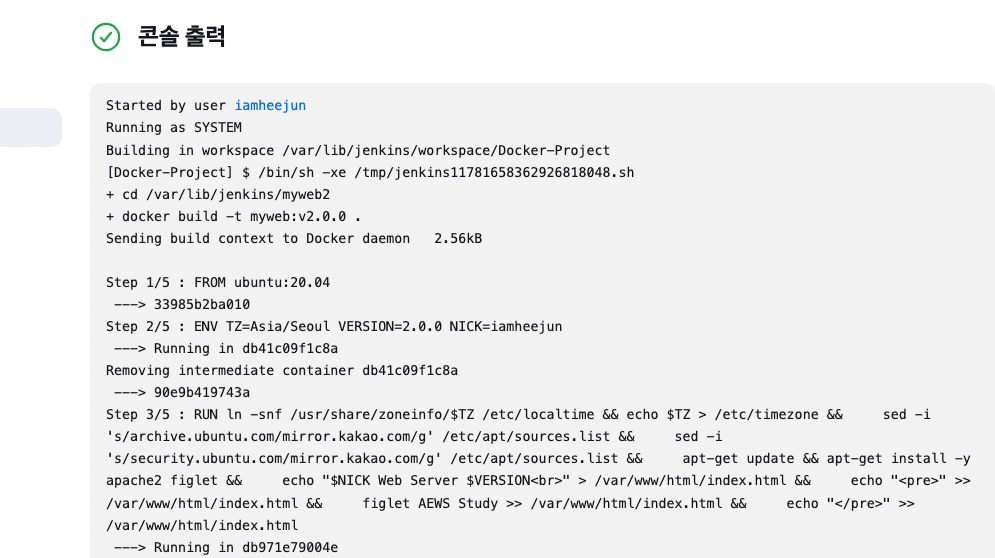
아까 썼던 명령어가 잘 출력되었다.
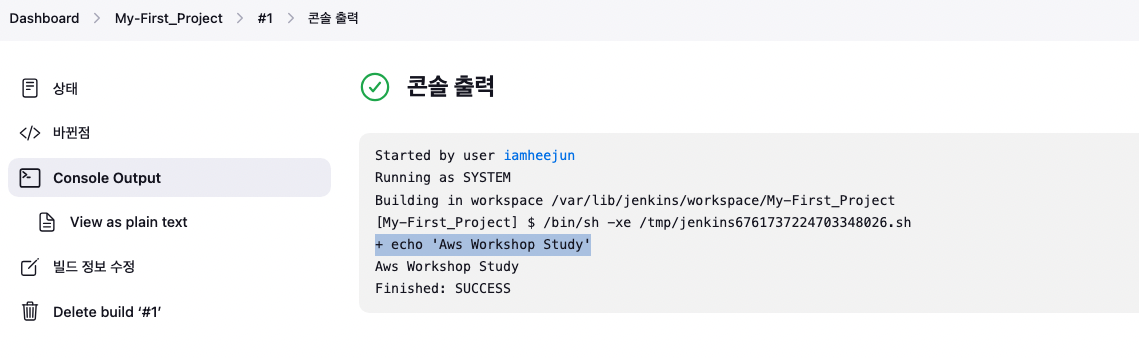
참고로 위에 출력물에 Building in workspace /var/lib/jenkins/workspace/...가 보인다. 해당 위치에 빌드결과물이 저장된다.(현재는 젠킨스서버가 제대로 설치되지 않아 안보임ㅠ)
도커사용
사전준비
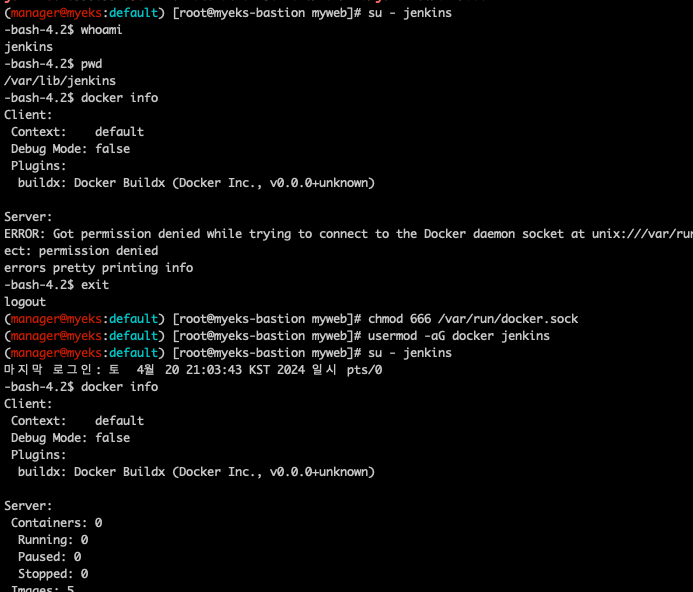
현재는 젠킨스 서버의 계정명이 /bin/false로 되어있음.

근데 저 젠킨스유저가 docker 명령어를 다 사용해야 빌드작업이 가능해진다.
따라서 쉘을 바꿔주고,
usermod -s /bin/bash jenkins
grep -i jenkins /etc/passwd
도커를 사용할 수 있도록 권한조정을 해준다.
도커허브에 로그인하여 로그인정보가 /var/lib/jenkins/.docker/config.json에 저장되었다.

이제 도커를 젠킨스가 사용해보기 위한 아이템을 새로 생성한다.
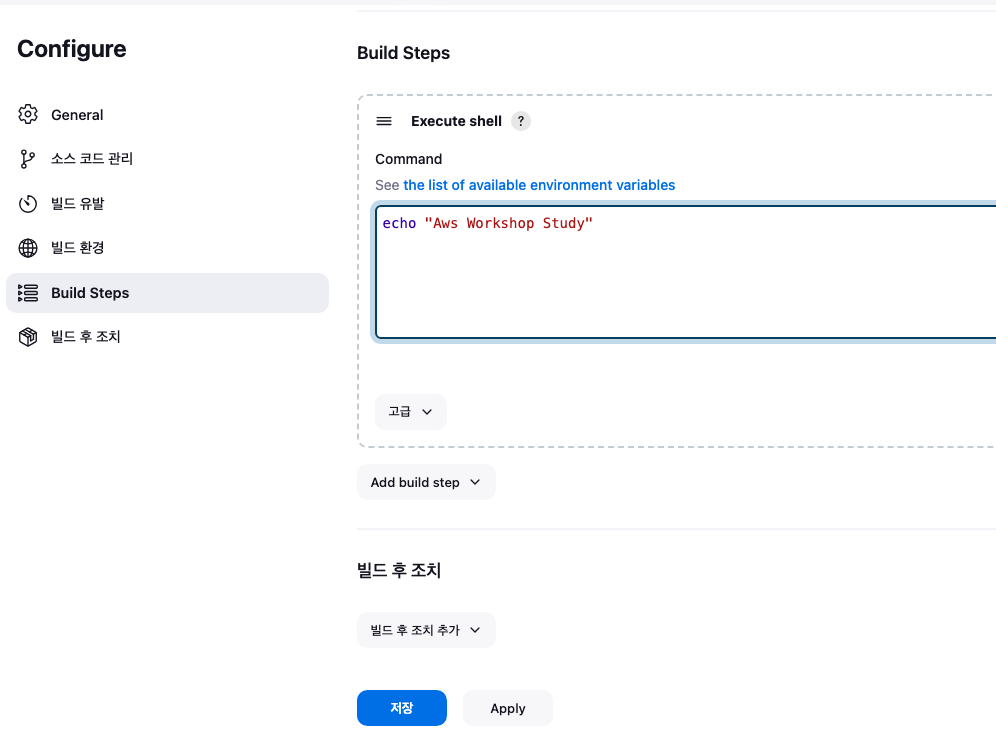
아래처럼 쉘들을 추가해준다.

위 쉘에 보이는 경로는 아래처럼 젠킨스서버에 Dockerfile이 있는 곳으로 설정해두었다.

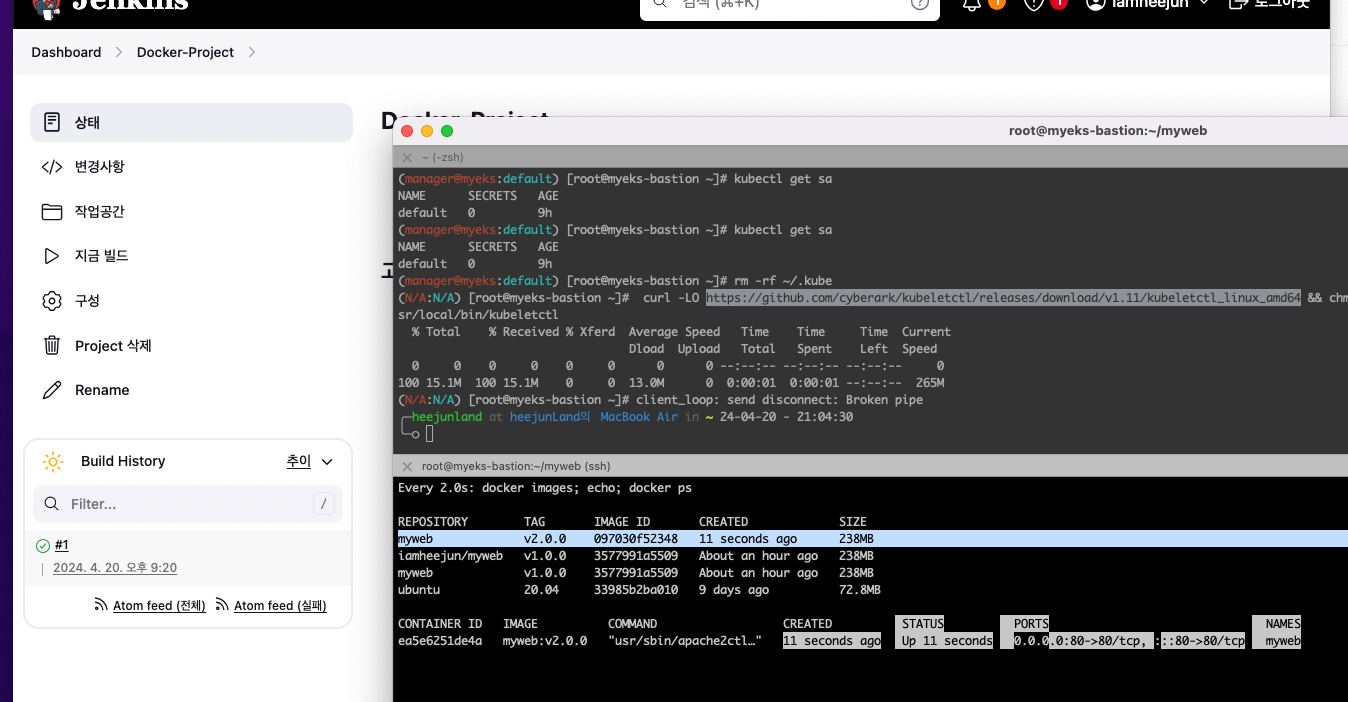
현재 이미지는 myweb이 v1.0.0이지만,

"지금빌드"를 눌러서 빌드를 실행해보면
myweb이미지 v2.0.0이 생성되었다!
콘솔도 정상적으로 출력되었다.

빌드유발
이건 현재 내 젠킨스서버 설치문제로 실습이 안되어서...나중에 시간될때 다시 제대로 설치해서 해보겠다.
젠킨스와 쿠버네티스
젠킨스 유저가 kubectl 명령어를 사용할 수 있어야 한다.
지금 상태로는 되지 않는다.


.kube/config설정을 해주어 권한을 해결해준다.
# root 계정에서 아래 복사 실행
cp ~/.kube/config /var/lib/jenkins/.kube/config
chown jenkins:jenkins /var/lib/jenkins/.kube/config
이제 된다

만약 안되면 jenkins유저의 홈디렉토리에 aws configure설정을 해주면된다.
[CD]ArgoCD
- Argo CD is a declarative, GitOps continuous delivery tool for Kubernetes
- Application definitions, configurations, and environments should be declarative and version controlled.
- Application deployment and lifecycle management should be automated, auditable, and easy to understand.
# helm 설치
cat <<EOT > argocd-values.yaml
global:
domain: argocd.$MyDomain
configs:
params:
server.insecure: true
controller:
metrics:
enabled: true
serviceMonitor:
enabled: true
server:
ingress:
enabled: true
controller: aws
ingressClassName: alb
hostname: "argocd.$MyDomain"
annotations:
alb.ingress.kubernetes.io/scheme: internet-facing
alb.ingress.kubernetes.io/target-type: ip
alb.ingress.kubernetes.io/backend-protocol: HTTP
alb.ingress.kubernetes.io/listen-ports: '[{"HTTPS":80}, {"HTTPS":443}]'
alb.ingress.kubernetes.io/certificate-arn: $CERT_ARN
alb.ingress.kubernetes.io/ssl-redirect: '443'
aws:
serviceType: ClusterIP
backendProtocolVersion: GRPC
metrics:
enabled: true
serviceMonitor:
enabled: true
repoServer:
metrics:
enabled: true
serviceMonitor:
enabled: true
applicationSet:
metrics:
enabled: true
serviceMonitor:
enabled: true
notifications:
metrics:
enabled: true
serviceMonitor:
enabled: true
EOT
kubectl create ns argocd
helm repo add argo https://argoproj.github.io/argo-helm
helm install argocd argo/argo-cd --version 6.7.11 -f argocd-values.yaml --namespace argocd
# 확인
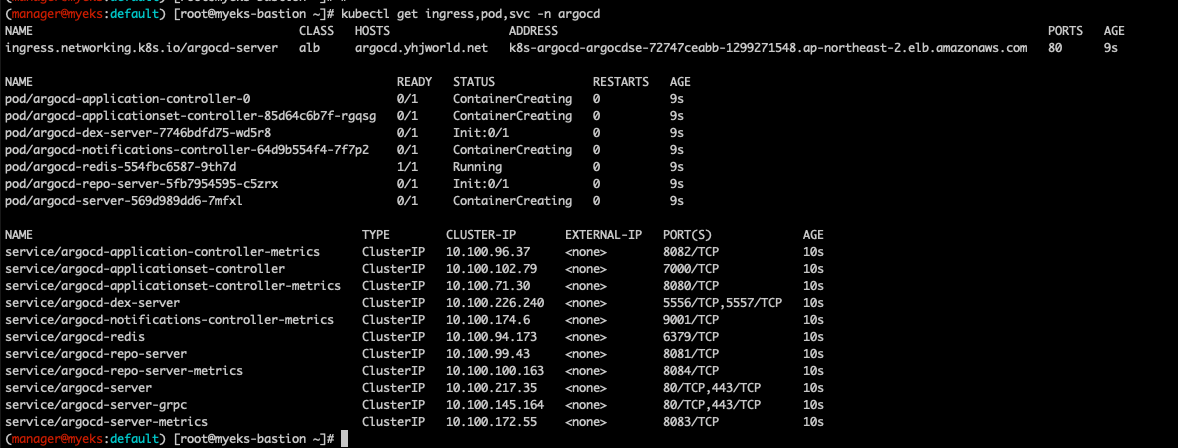
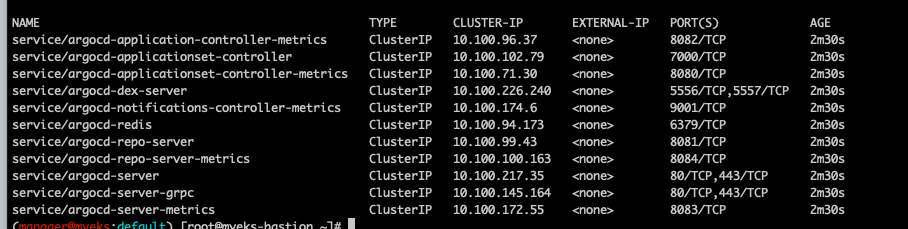
kubectl get ingress,pod,svc -n argocd
kubectl get crd | grep argo
applications.argoproj.io 2024-04-14T08:12:16Z
applicationsets.argoproj.io 2024-04-14T08:12:17Z
appprojects.argoproj.io 2024-04-14T08:12:16Z
# 최초 접속 암호 확인
kubectl -n argocd get secret argocd-initial-admin-secret -o jsonpath="{.data.password}" | base64 -d ;echo
MC3y8rzzECTIAHSB

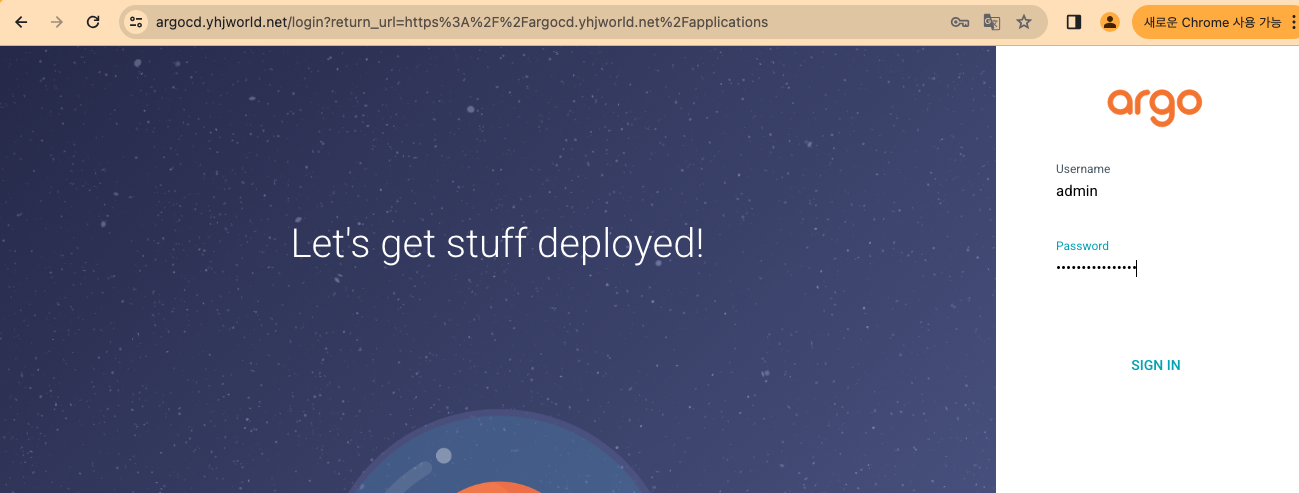
배포되면 아래처럼 https://argocd.도메인 으로 접속이 되고, 유저네임은 admin 과 비번은 kubectl -n argocd get secret argocd-initial-admin-secret -o jsonpath="{.data.password}" | base64 -d ;echo 으로 로그인한다.
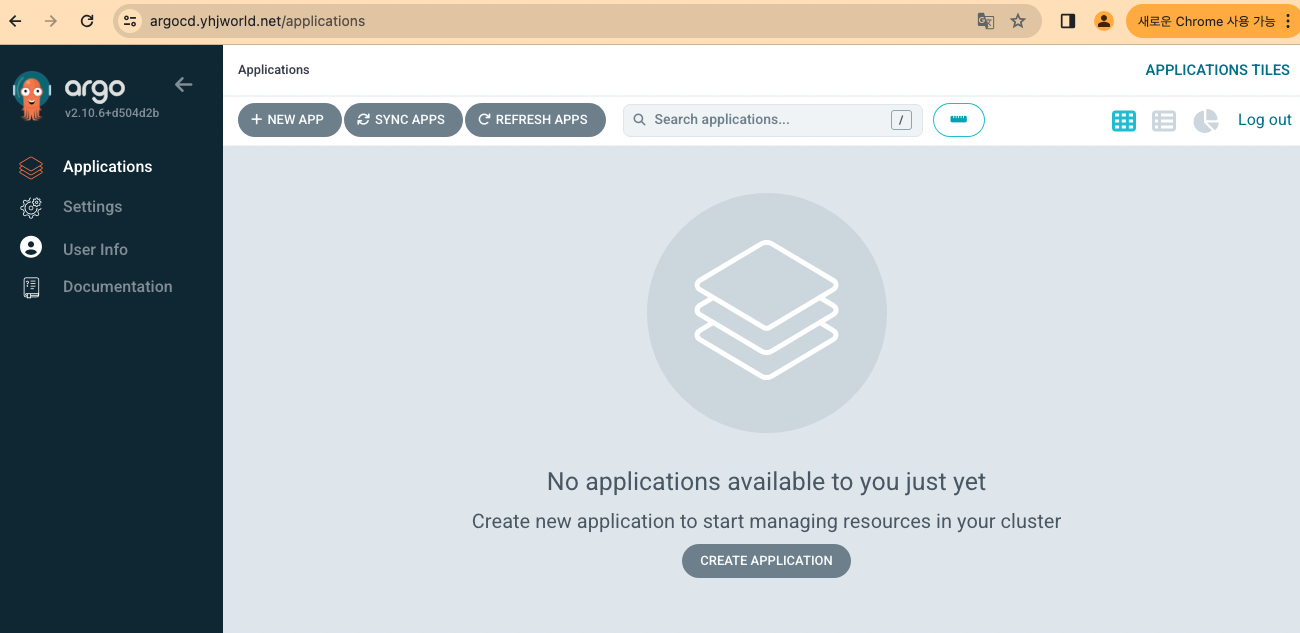
접속됨. 이 화면이 바로 argocd의 api서버이다.
아래는 argocd의 아키텍쳐이다.
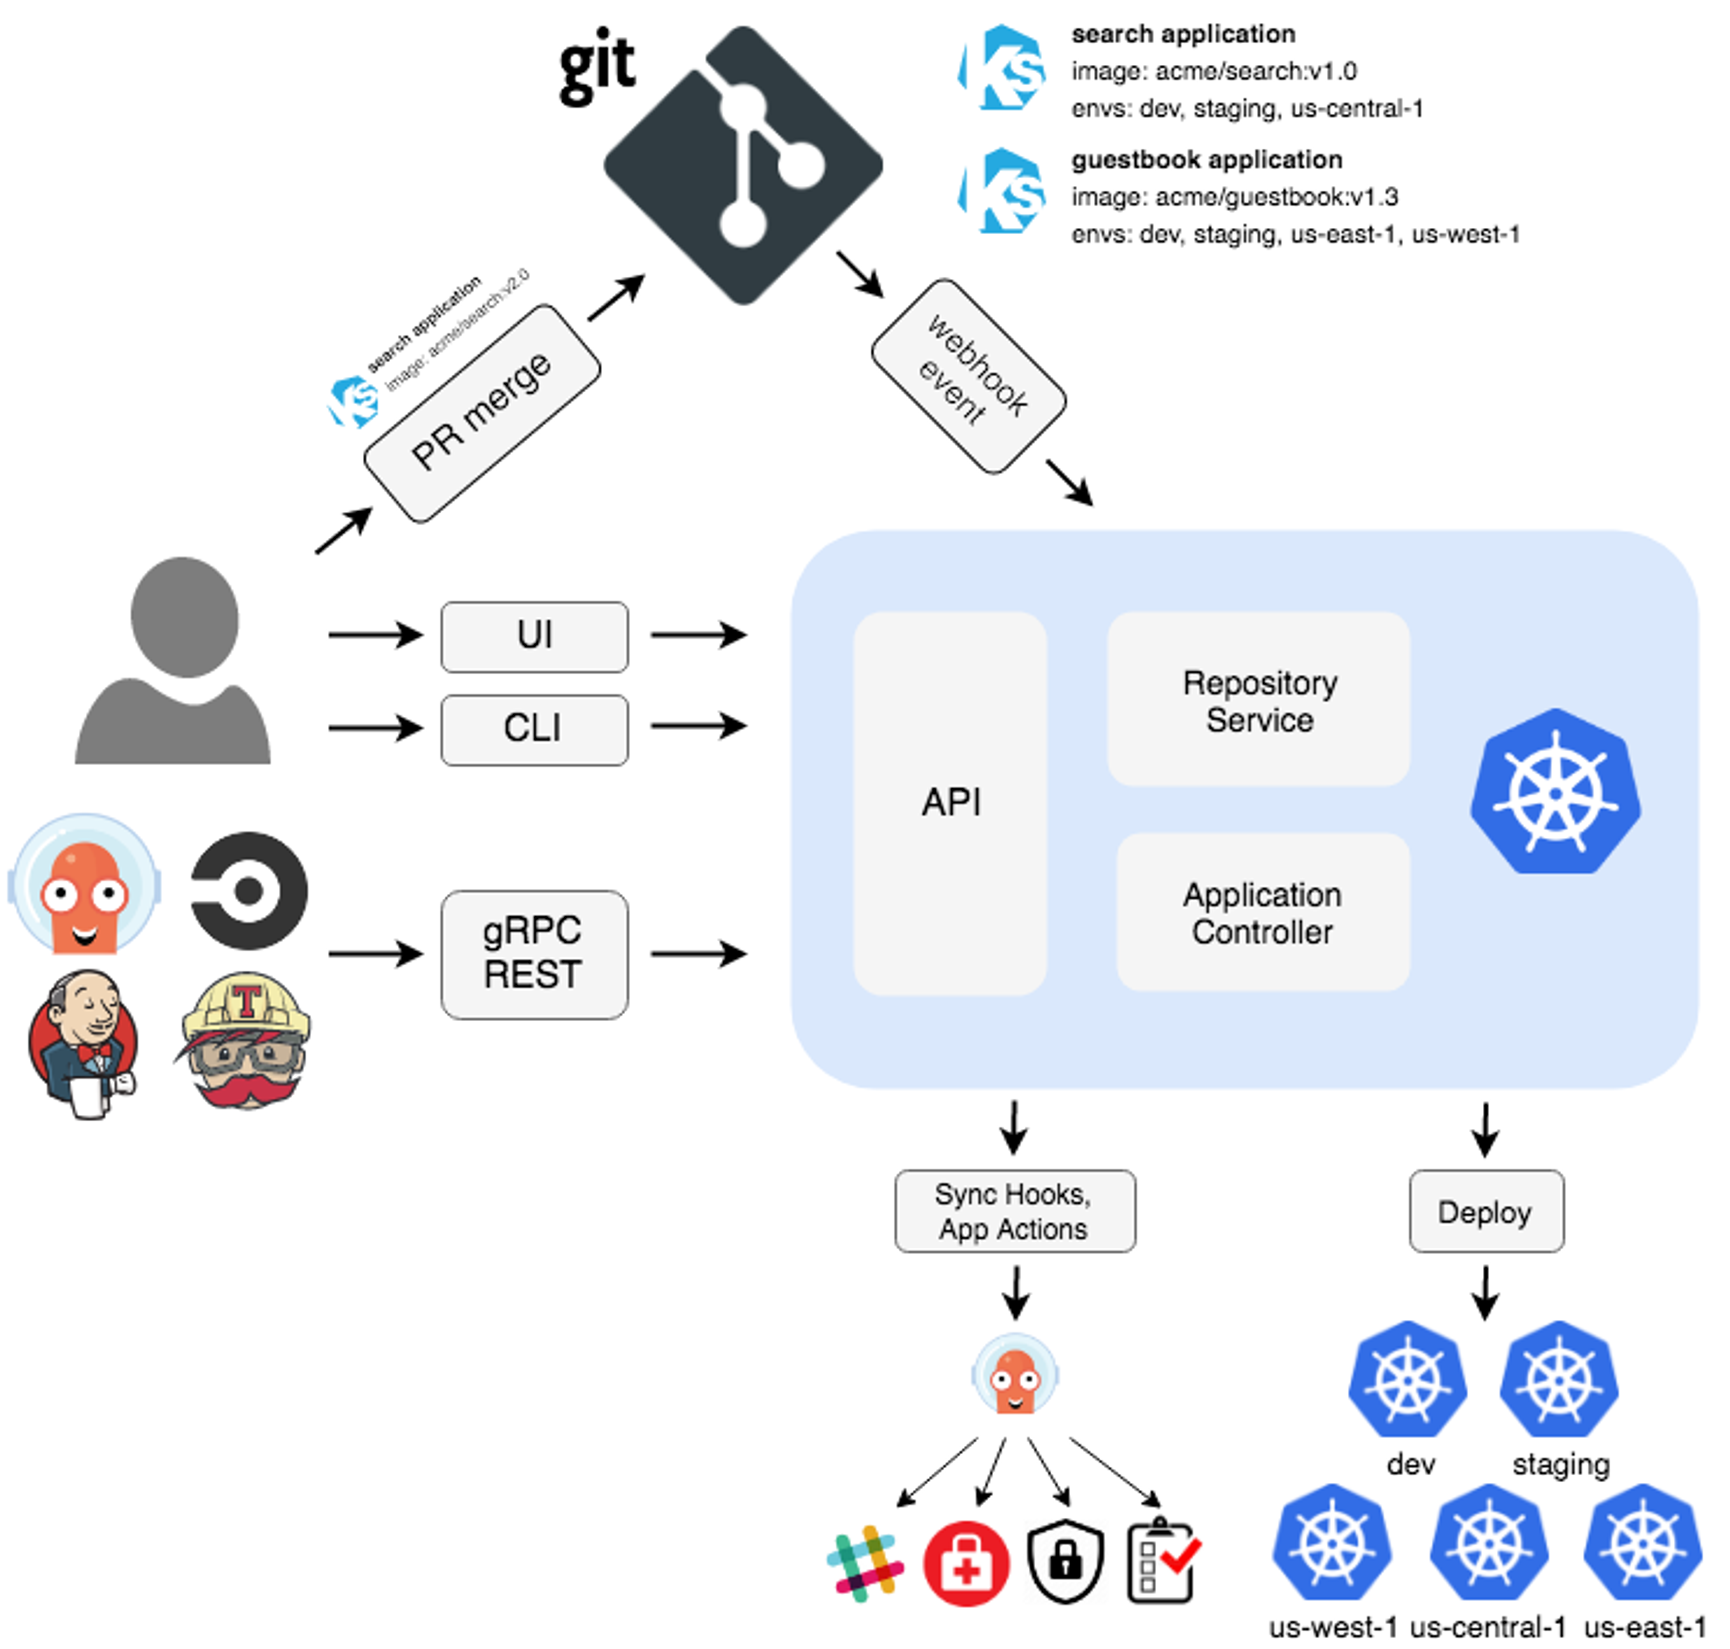
위 구성도에 보이는 서버들이 실제로 방금 배포한 argocd 서비스에 존재하는게 보인다.
각 구성요소 설명은 아래와 같다.
- API Server : Web UI 대시보드, k8s api 처럼 API 서버 역할
- The API server is a gRPC/REST server which exposes the API consumed by the Web UI, CLI, and CI/CD systems. It has the following responsibilities:
- application management and status reporting
- invoking of application operations (e.g. sync, rollback, user-defined actions)
- repository and cluster credential management (stored as K8s secrets)
- authentication and auth delegation to external identity providers
- RBAC enforcement
- listener/forwarder for Git webhook events
- Repository Server : Git 연결 및 배포할 yaml 생성
- The repository server is an internal service which maintains a local cache of the Git repository holding the application manifests. It is responsible for generating and returning the Kubernetes manifests when provided the following inputs:
- repository URL
- revision (commit, tag, branch)
- application path
- template specific settings: parameters, helm values.yaml
- Application Controller : k8s 리소스 모니터링, Git과 비교
- The application controller is a Kubernetes controller which continuously monitors running applications and compares the current, live state against the desired target state (as specified in the repo). It detects OutOfSync application state and optionally takes corrective action. It is responsible for invoking any user-defined hooks for lifecycle events (PreSync, Sync, PostSync)
- Redis : k8s api와 git 요청을 줄이기 위한 캐싱
- Notification : 이벤트 알림, 트리거
- Dex : 외부 인증 관리
- ApplicationSet Controller : 멀티 클러스터를 위한 App 패키징 관리
실습
위에서 설정한 소스의 위치는 아래 내 깃허브의 yaml파일이다.
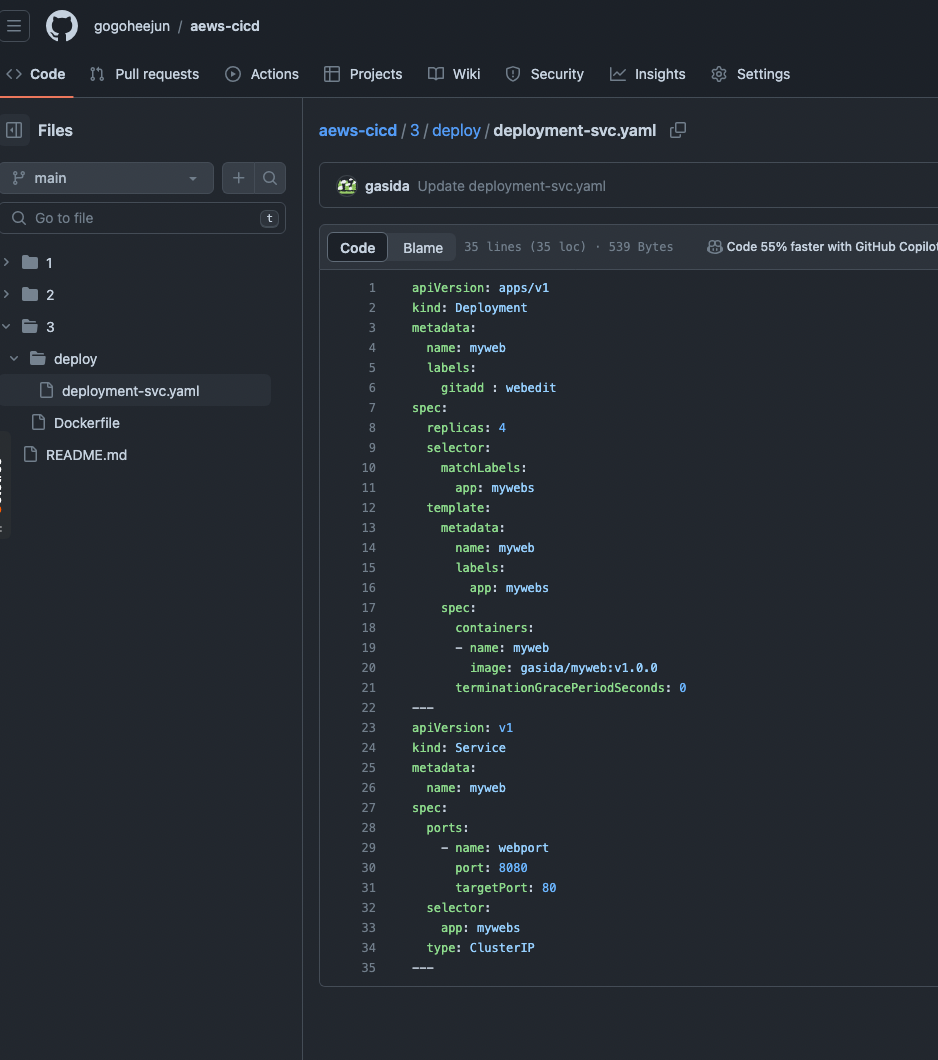
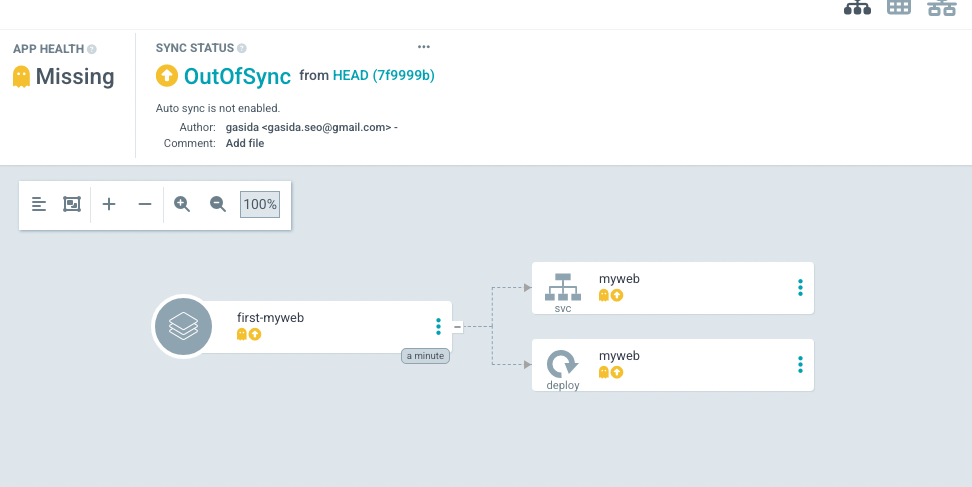
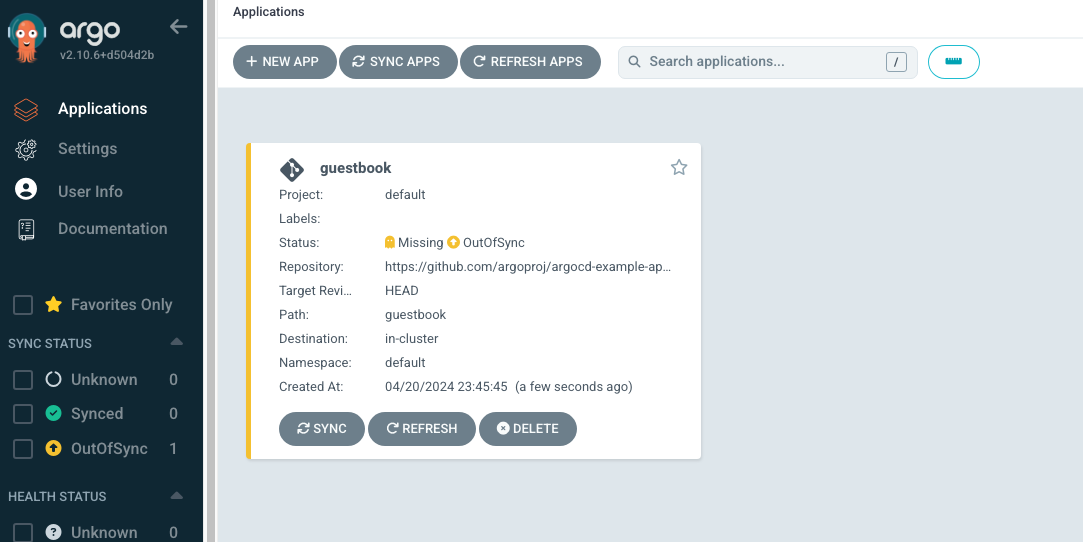
argocd의 위 설정을 생성하면, 아래처럼 OutOfSync가 뜨는데, 바로 위 yaml을 기반으로 정보를 가져온것이다.
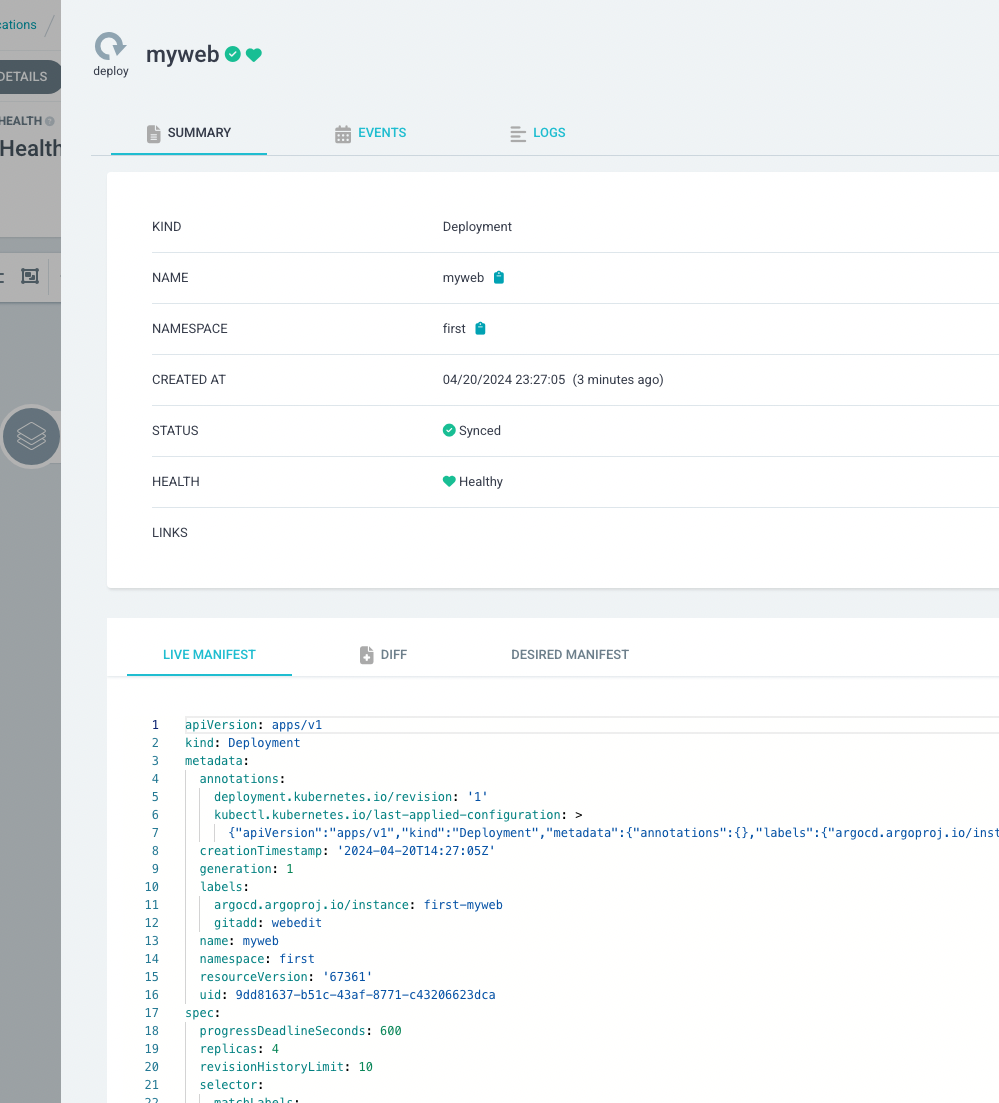
정말 deployment가 myweb이란 게있고, service도 myweb이라고 yaml에 있는데 그대로 argocd가 읽어왔다.
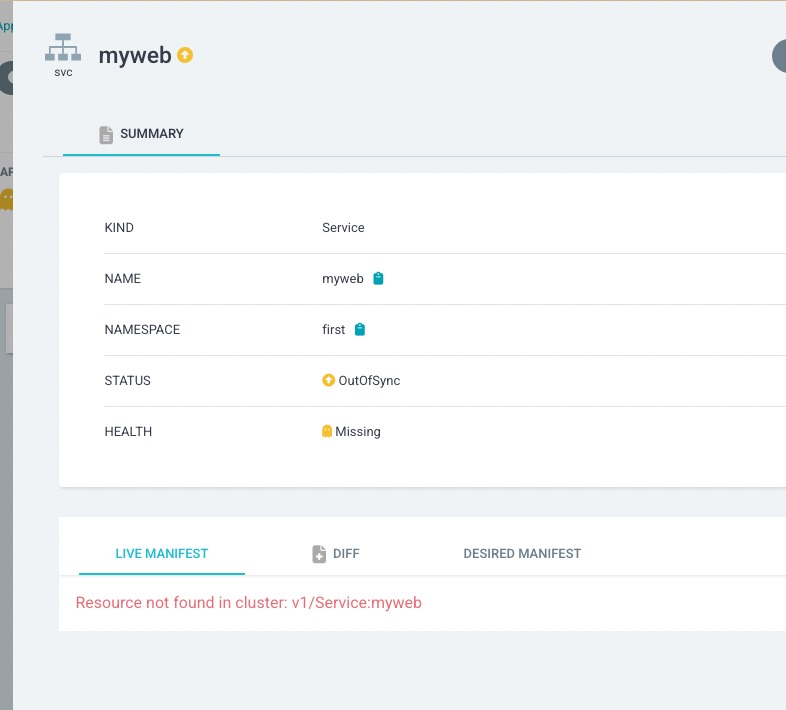
서비스를 클릭해서 보면 Live Menifest와 Desired Manifest가 일치하지 않는다.
Desire Manifest는 깃 소스를 말하고, Live는 배포된 상태를 말한다.
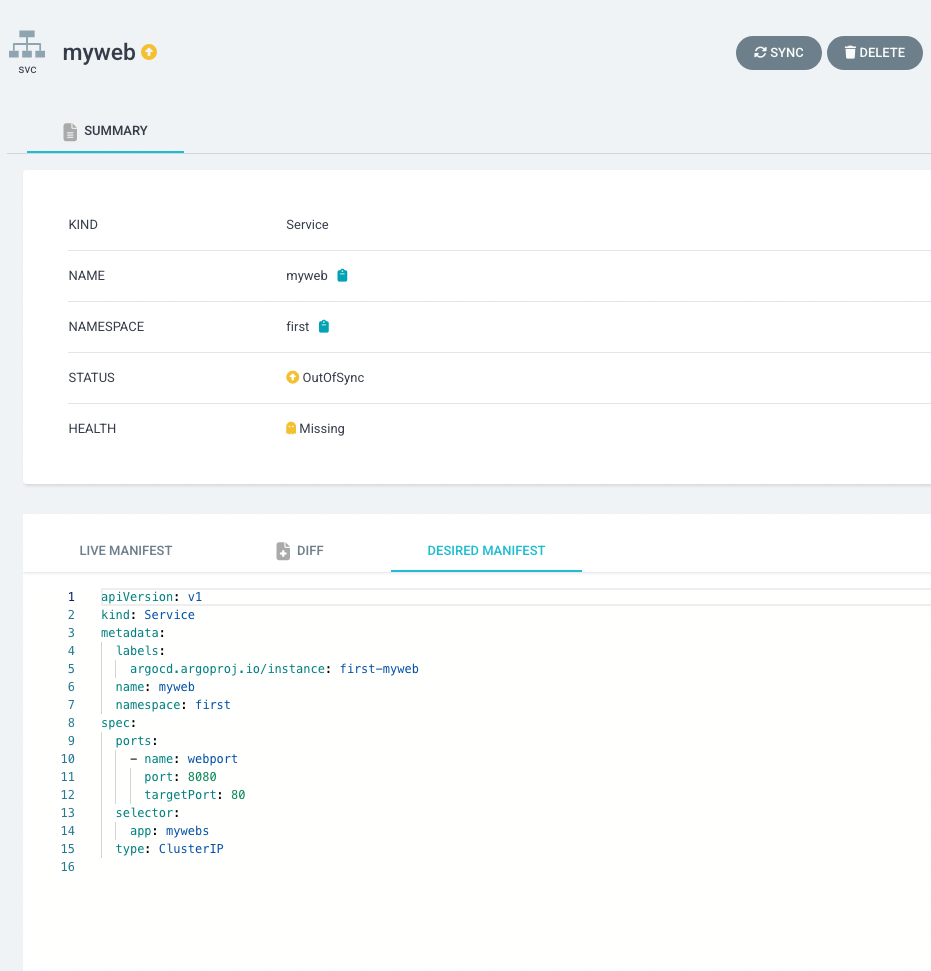
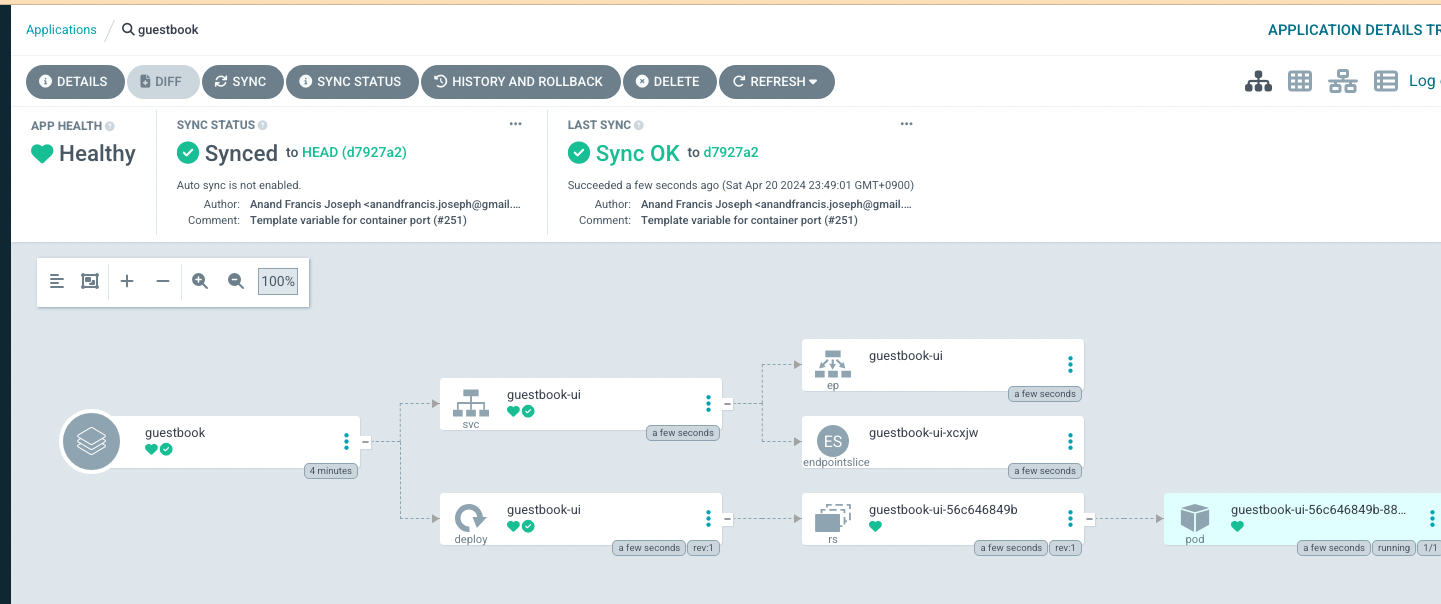
Sync를 하면,
이젠 이전엔 보이지 않던 Live Manifest도 보인다. 왜냐면 이는 배포된 현재 상태를 보여주므로.
Live Manifest를 직접 한번 수정해보자.
lable을 한번 수정해봤는데 즉시 반영이 된다.
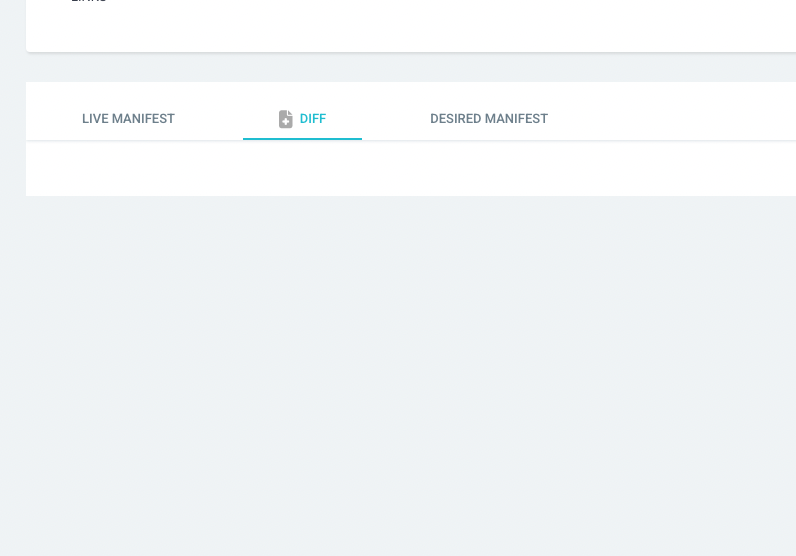
근데 Desired는 내 깃허브 소스니까 해당 사항이 없을테니 Diff에 보여야 하지않나싶지만 보이지 않는다.
직접 알고씨디에서 바꾼건 쿠버네티스의 자원을 직접 수정한거와 다름없다.
(쿠버네티스의 정보를 직접 가져와 ArgoCd에 반영해주는 기능은 Application Controller가 해줌)
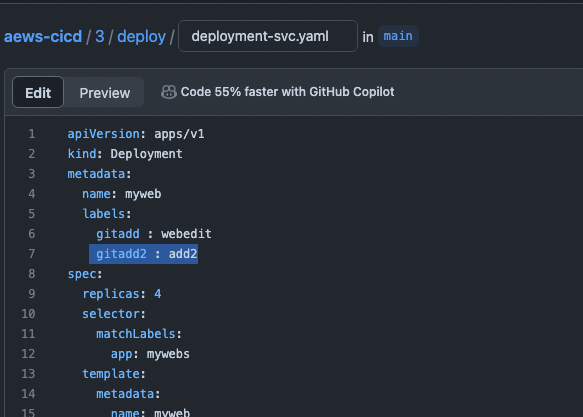
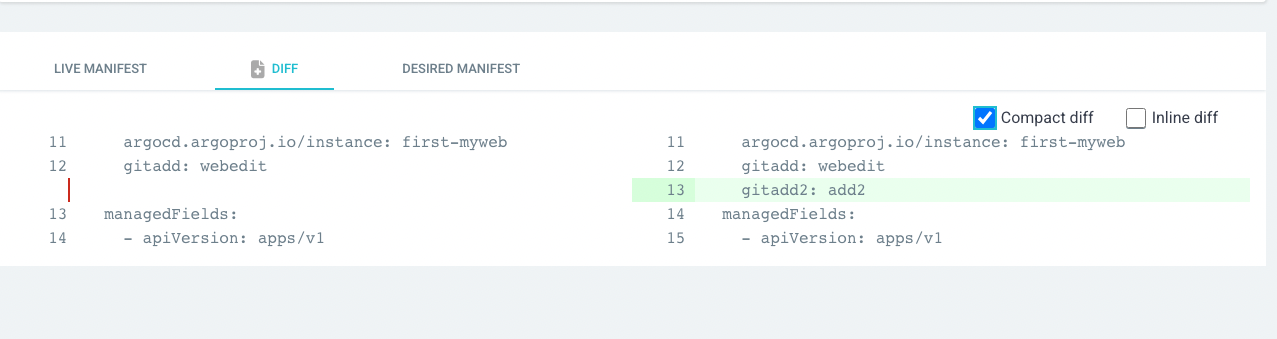
이번엔 직접 깃허브 소스에 gitadd2: add2라는 라벨을 추가해보았다.
그랬더니 Diff가 이제서야 보인다.
다시 sync를 해줘야 위 차이는 해소된다.
이렇게 쿠버네티스나 argoCd에서 직접 바꿨을 때 Diff에서 보이지 않는 이유는, 모든 소스와 상태변경은 깃을 통하도록 하기 위함인 것 같다.
즉 깃옵스의 철학은
GitOps를 하려거든 대상(k8s)에서 변경하지 말고, 소스(git)에서 변경하자! 임을 알게 되었다.
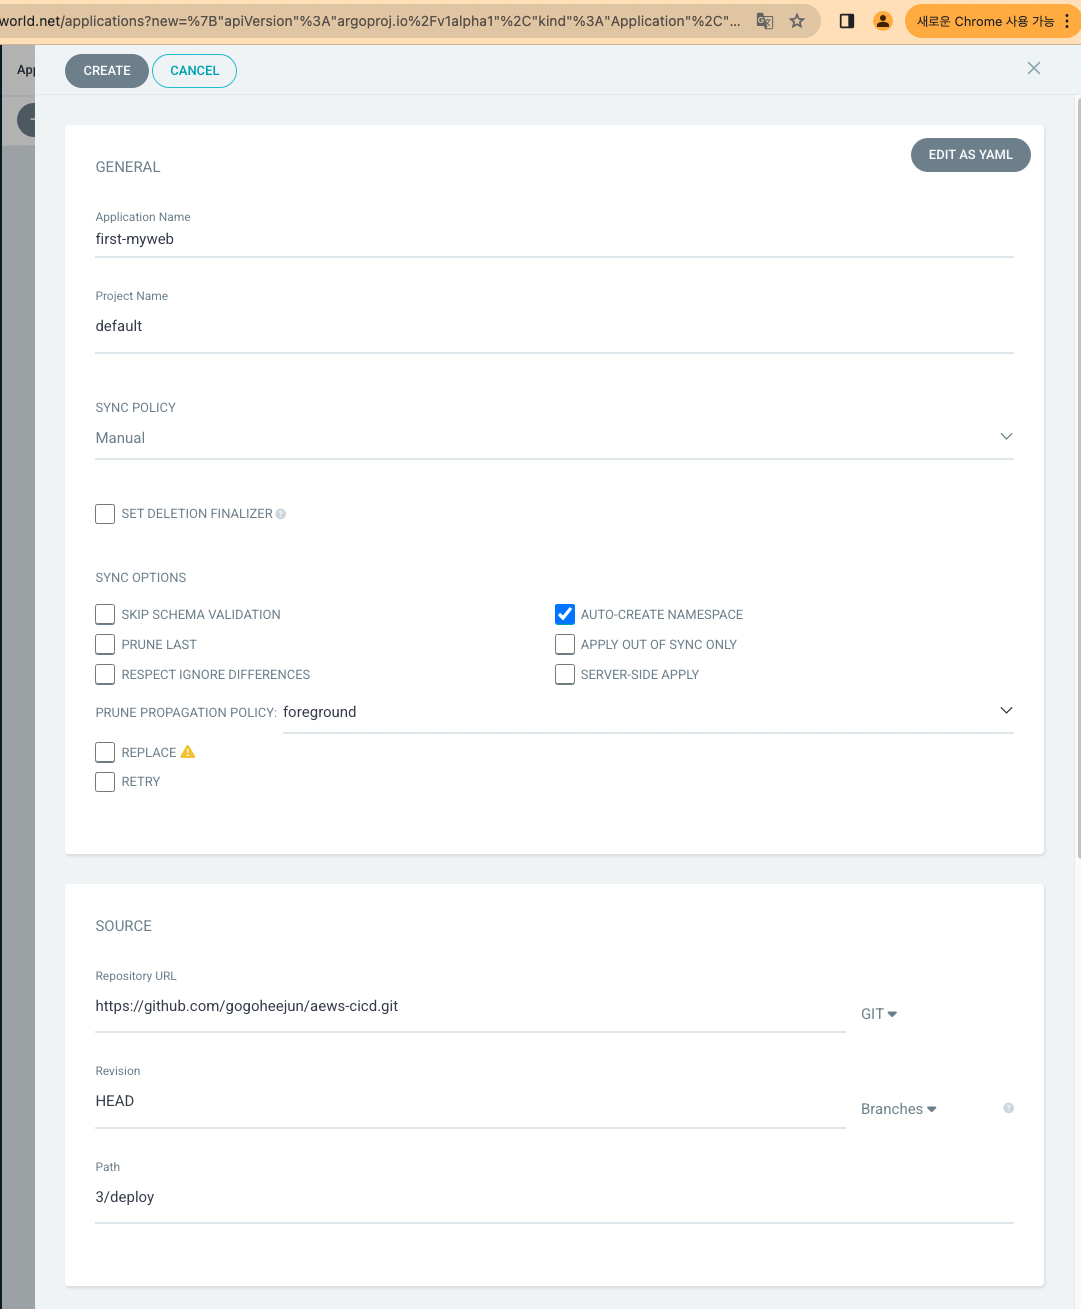
ArgoCD CLI 로 앱 생성
curl -sSL -o argocd-linux-amd64 https://github.com/argoproj/argo-cd/releases/latest/download/argocd-linux-amd64
sudo install -m 555 argocd-linux-amd64 /usr/local/bin/argocd
rm -f argocd-linux-amd64

#
argocd version

#
argocd login argocd.$MyDomain
Username: admin
Password: ###
'admin:login' logged in successfully

#
kubectl config get-contexts -o name
admin@myeks.ap-northeast-2.eksctl.io
argocd cluster add admin@myeks.ap-northeast-2.eksctl.io
y 입력

#
argocd app list
NAME  CLUSTER  NAMESPACE  PROJECT  STATUS  HEALTH  SYNCPOLICY  CONDITIONS  REPO  PATH  TARGET
#
kubectl config set-context --current --namespace=argocd
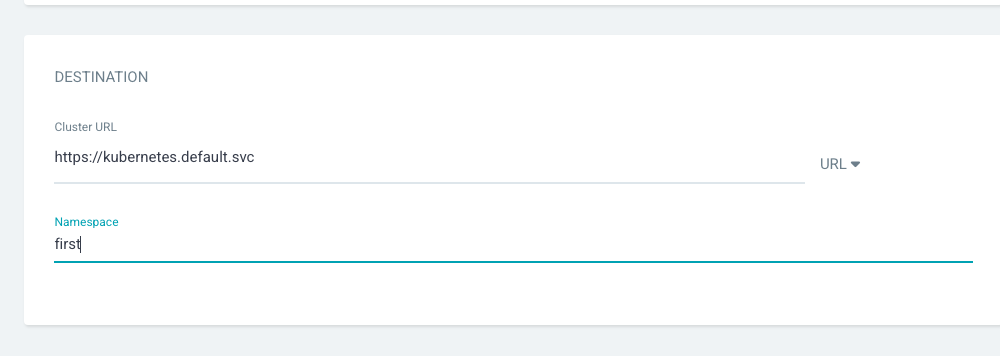
argocd app create guestbook --repo https://github.com/argoproj/argocd-example-apps.git --path guestbook --dest-server https://kubernetes.default.svc --dest-namespace default
#
argocd app list
NAME CLUSTER NAMESPACE PROJECT STATUS HEALTH SYNCPOLICY CONDITIONS REPO PATH TARGET
argocd/guestbook https://kubernetes.default.svc default default OutOfSync Missing <none> <none> https://github.com/argoproj/argocd-example-apps.git guestbook
앱 정보확인
#
argocd app get guestbook
...

# 모니터링
watch -d kubectl get pod,svc,ep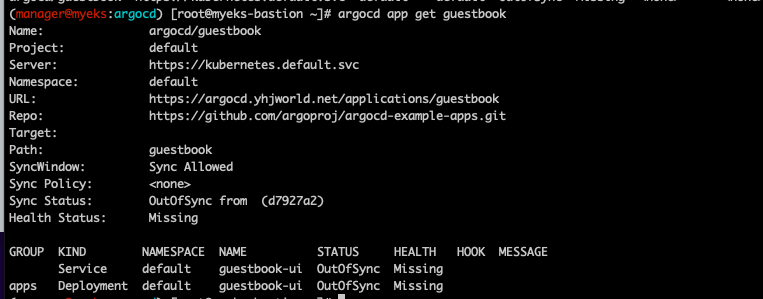
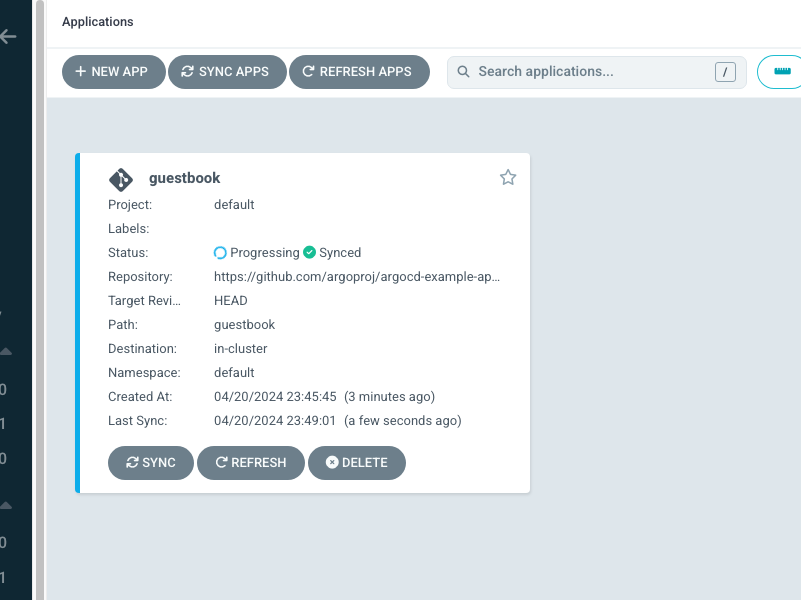
싱크하기
#
argocd app sync guestbook
싱크 누르자마자 바로 시작된다.
Argo Rollout
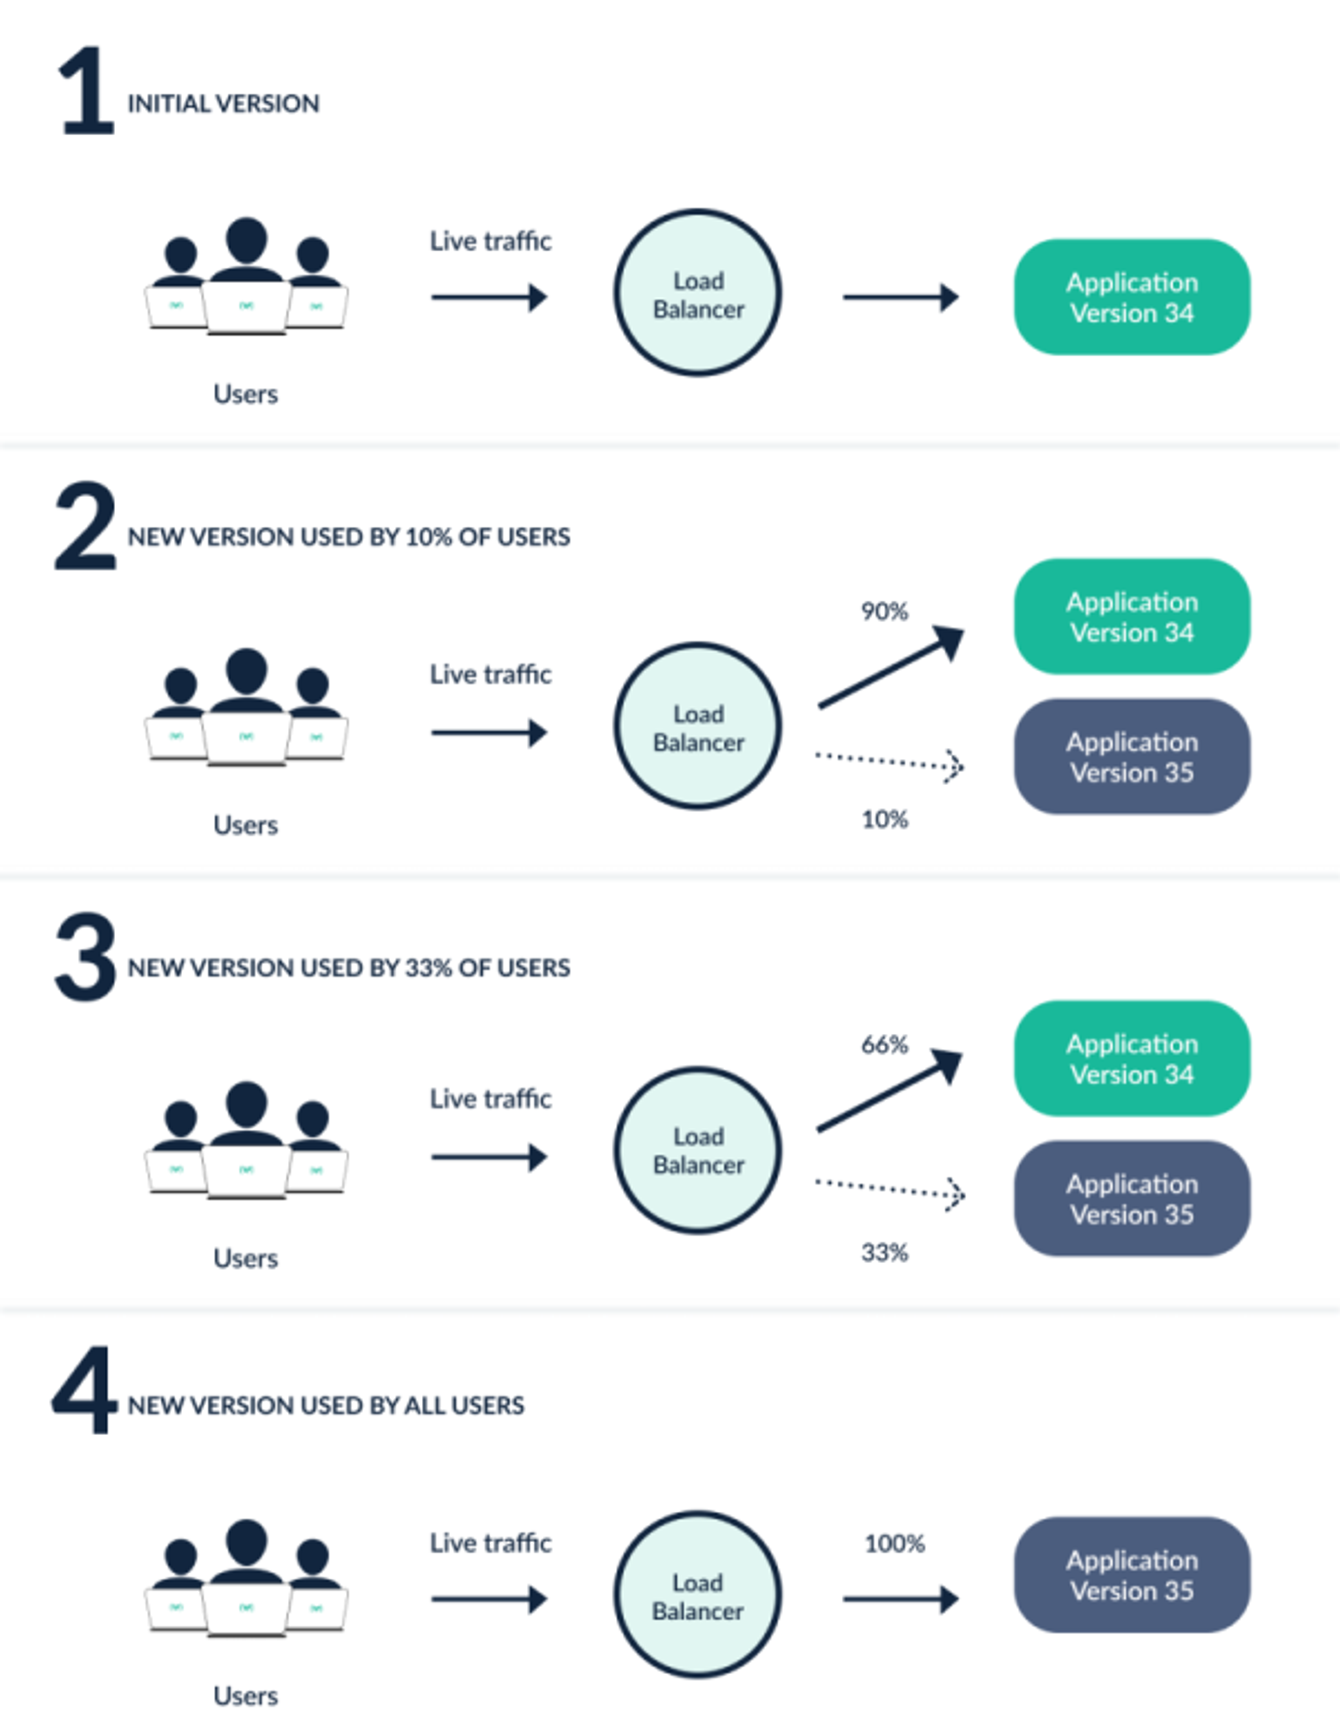
- Argo Rollouts : Argo Rollouts is a Kubernetes controller and set of CRDs which provide advanced deployment capabilities such as blue-green, canary, canary analysis, experimentation, and progressive delivery features to Kubernetes.
- Argo Rollouts (optionally) integrates with ingress controllers and service meshes, leveraging their traffic shaping abilities to gradually shift traffic to the new version during an update. Additionally, Rollouts can query and interpret metrics from various providers to verify key KPIs and drive automated promotion or rollback during an update.
- Why Argo Rollouts?
- The native Kubernetes Deployment Object supports the RollingUpdate strategy which provides a basic set of safety guarantees (readiness probes) during an update. However the rolling update strategy faces many limitations:
- Few controls over the speed of the rollout
- Inability to control traffic flow to the new version
- Readiness probes are unsuitable for deeper, stress, or one-time checks
- No ability to query external metrics to verify an update
- Can halt the progression, but unable to automatically abort and rollback the update
- Controller Features
- Blue-Green update strategy
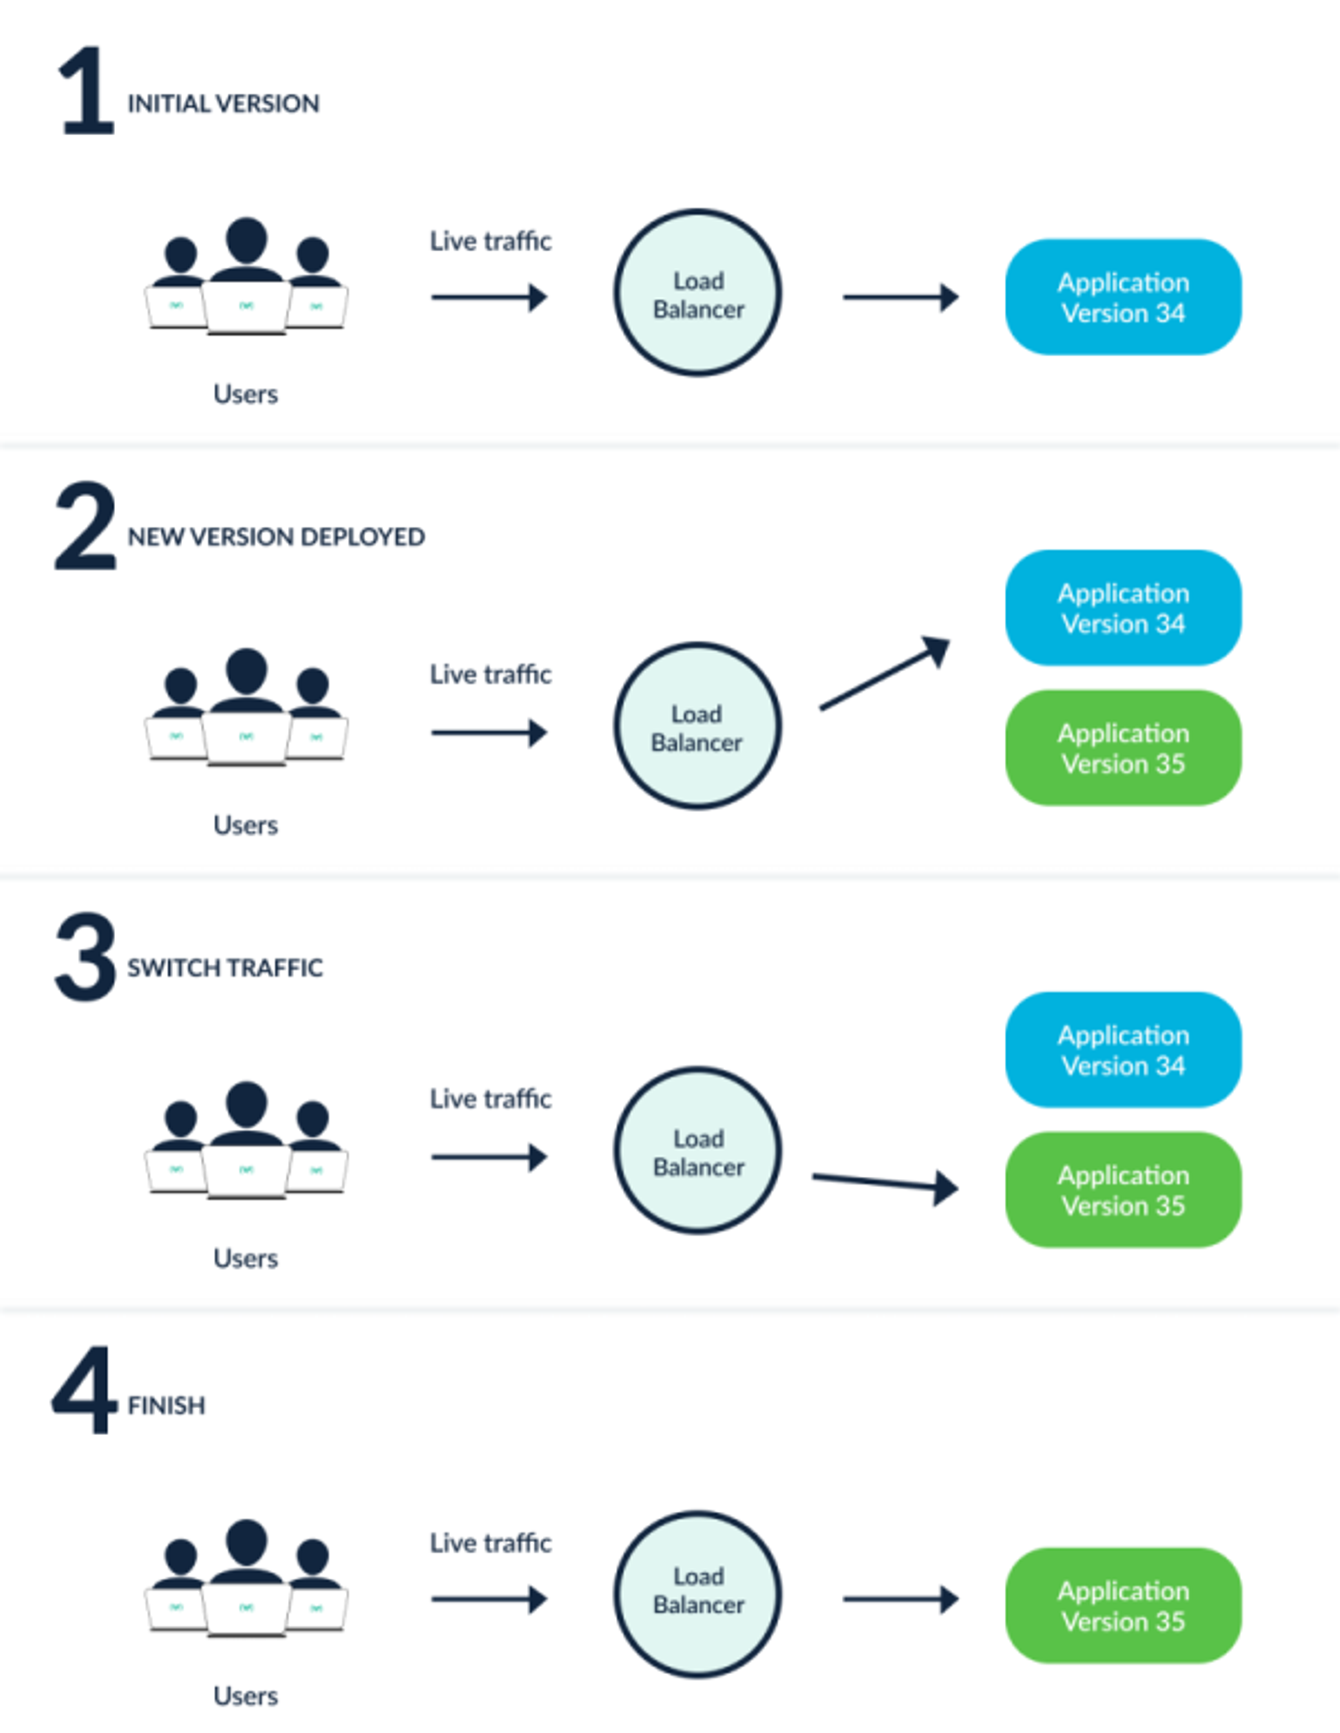
- Canary update strategy
- 설치
#
cat <<EOT > argorollouts-values.yaml
dashboard:
enabled: true
ingress:
enabled: true
ingressClassName: alb
hosts:
- argorollouts.$MyDomain
annotations:
alb.ingress.kubernetes.io/scheme: internet-facing
alb.ingress.kubernetes.io/target-type: ip
alb.ingress.kubernetes.io/backend-protocol: HTTP
alb.ingress.kubernetes.io/listen-ports: '[{"HTTPS":80}, {"HTTPS":443}]'
alb.ingress.kubernetes.io/certificate-arn: $CERT_ARN
alb.ingress.kubernetes.io/ssl-redirect: '443'
EOT
kubectl create ns argo-rollouts
helm install argo-rollouts argo/argo-rollouts --version 2.35.1 -f argorollouts-values.yaml --namespace argo-rollouts
# 확인
kubectl get all -n argo-rollouts
kubectl get crd | grep argo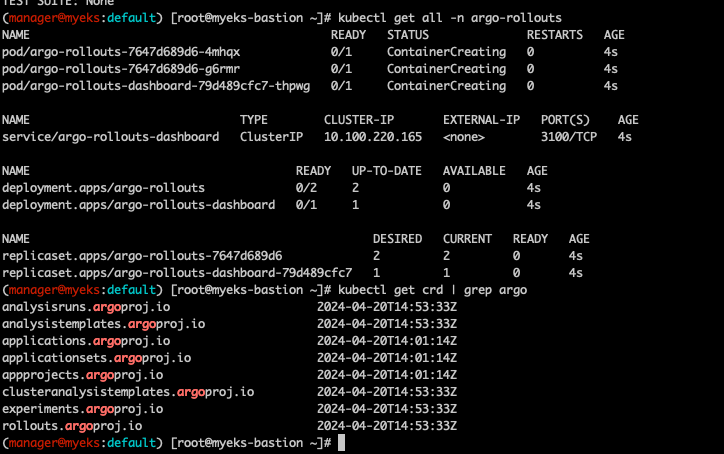
- CLI 설치
#
curl -LO https://github.com/argoproj/argo-rollouts/releases/download/v1.6.4/kubectl-argo-rollouts-linux-amd64
chmod +x ./kubectl-argo-rollouts-linux-amd64
mv ./kubectl-argo-rollouts-linux-amd64 /usr/local/bin/kubectl-argo-rollouts

# 설치 확인
kubectl argo rollouts version
- 대시보드
https://argorollouts.<자신의 도메인>/rollouts/
실습
# Run the following command to deploy the initial Rollout and Service:
kubectl apply -f https://raw.githubusercontent.com/argoproj/argo-rollouts/master/docs/getting-started/basic/rollout.yaml
kubectl apply -f https://raw.githubusercontent.com/argoproj/argo-rollouts/master/docs/getting-started/basic/service.yaml
-> 아래 내용이 설정이 되어있는 yaml이다.
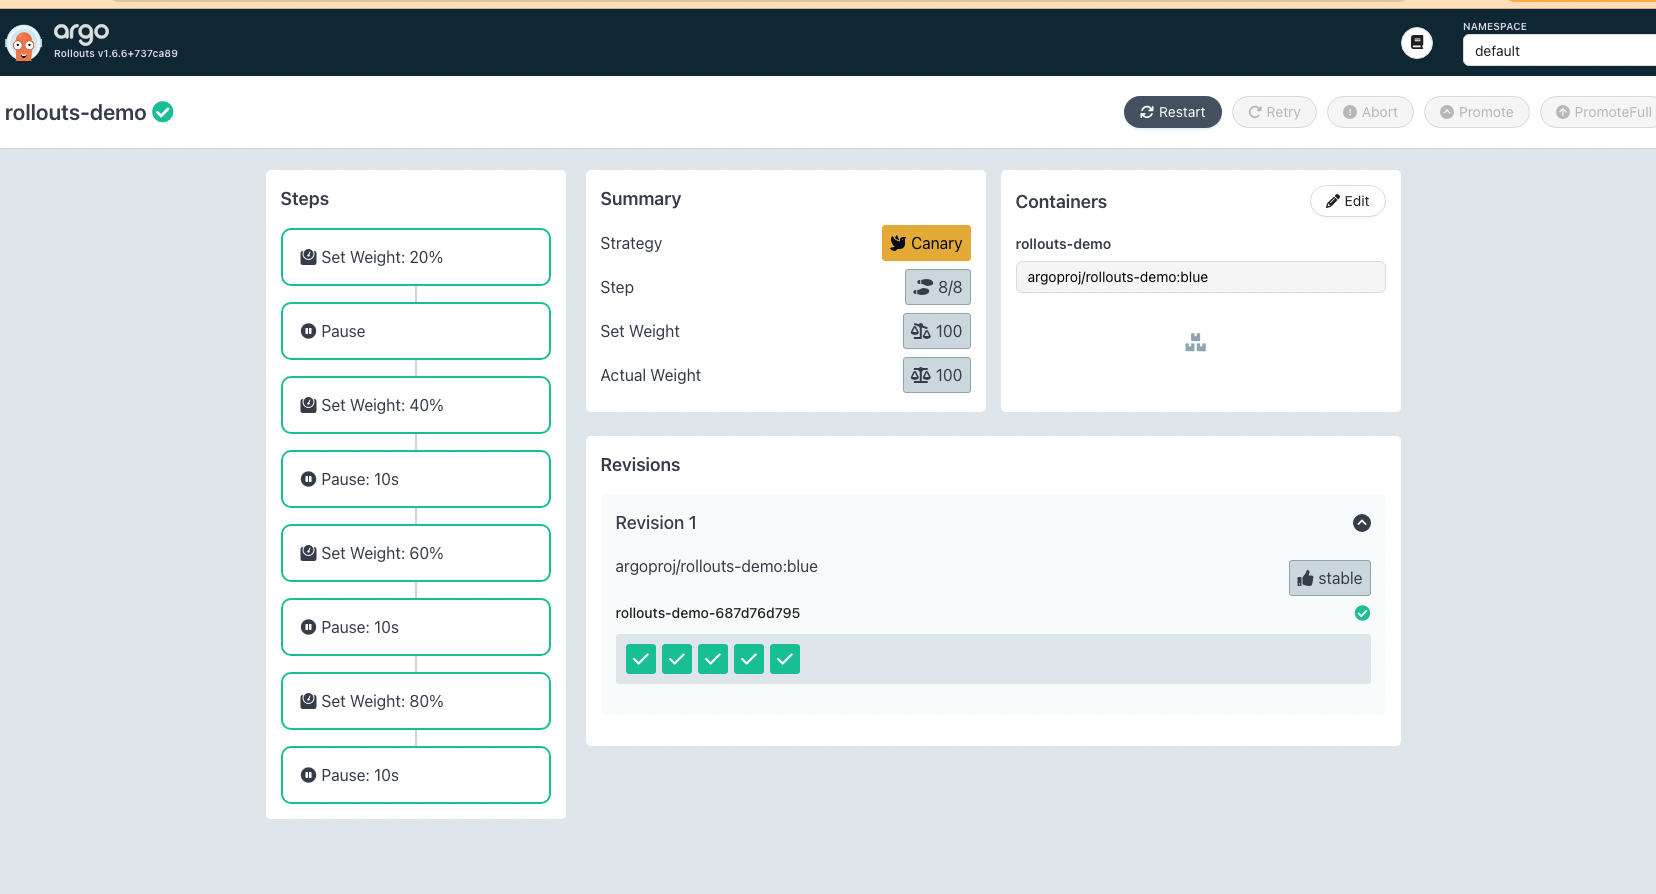
spec:
replicas: 5
strategy:
canary:
steps:
- setWeight: 20
- pause: {}
- setWeight: 40
- pause: {duration: 10}
- setWeight: 60
- pause: {duration: 10}
- setWeight: 80
- pause: {duration: 10}
kubectl argo rollouts get rollout rollouts-demo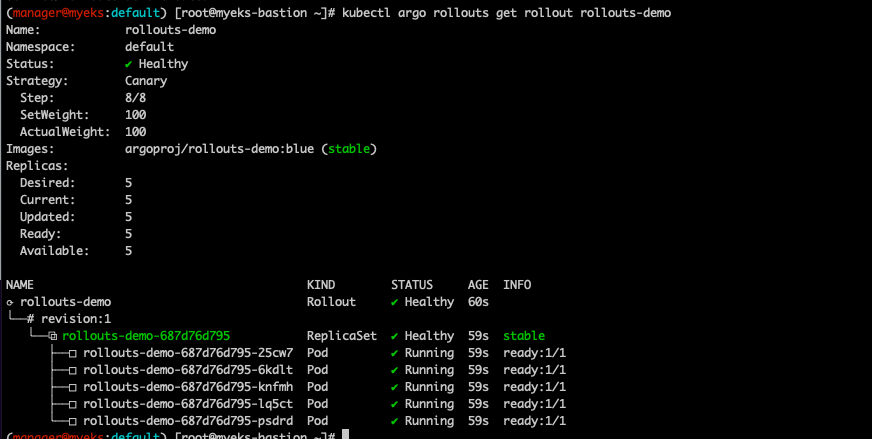
대시보드에도 보인다.
배포를 해보자.
#
watch -d kubectl get pod -n argocd -l app=rollouts-demo -owide --show-labels

# Run the following command to update the rollouts-demo Rollout with the "yellow" version of the container:
kubectl argo rollouts set image rollouts-demo rollouts-demo=argoproj/rollouts-demo:yellow
'개발삽질 > 잡다한 개발기록' 카테고리의 다른 글
| [EKS 스터디-6] EKS Security (0) | 2024.04.13 |
|---|---|
| [EKS 스터디-5] EKS Autoscaling (0) | 2024.04.03 |
| [EKS 스터디-4] EKS Observability (0) | 2024.03.26 |
| [EKS 스터디-2] 하) EKS 네트워크 공부 (0) | 2024.03.16 |
| [EKS 스터디-1] 클러스터 구조와 기본사용법 (0) | 2024.03.06 |


댓글